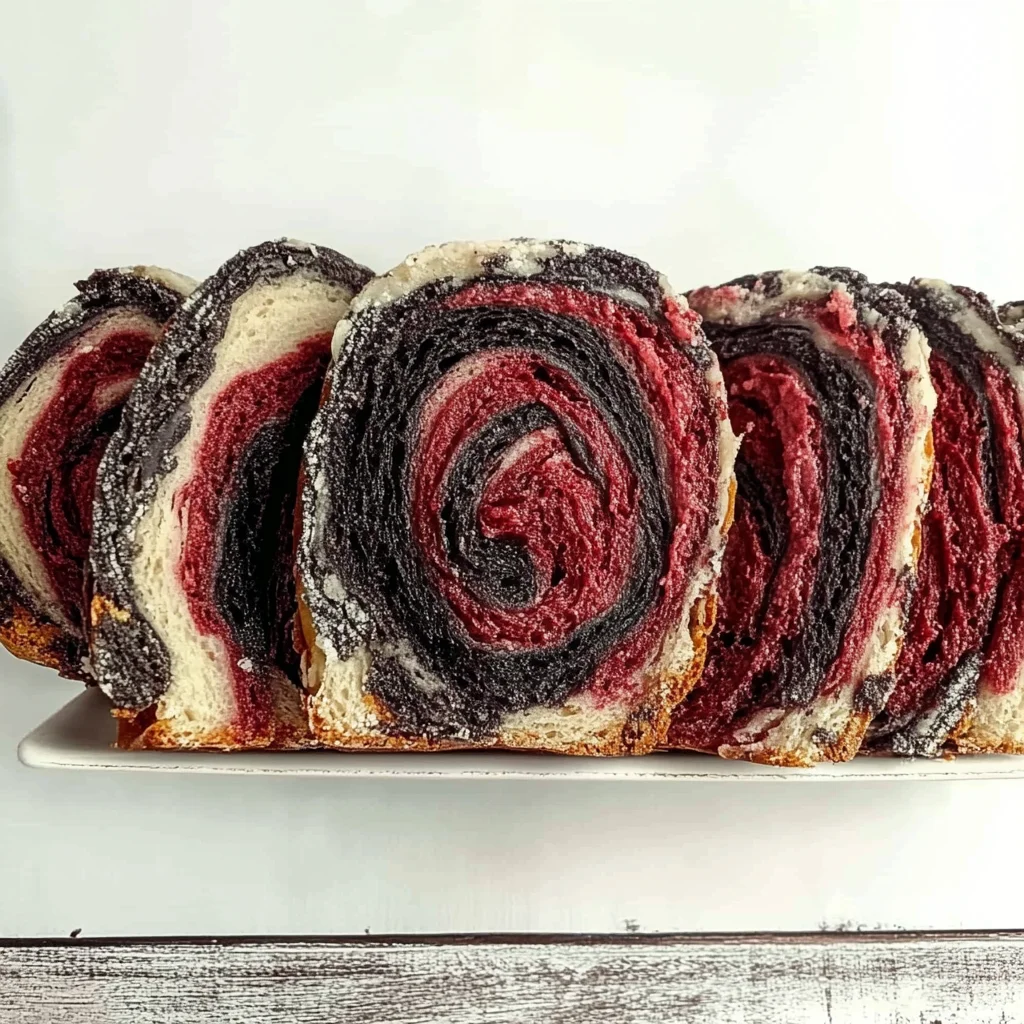
Vampire Bread is a delightful and spooky treat that adds a touch of magic to any Halloween gathering. This swirled loaf, with its bold black and red colors, not only looks impressive but also tastes fantastic with its soft, slightly sweet crumb. Whether you serve it as a festive snack or use it as the base for themed sandwiches, Vampire Bread is sure to impress guests of all ages. Plus, it’s a fun baking project that’s perfect for getting kids involved in the kitchen!

Jump to:
- Why You’ll Love This Recipe
- Tools and Preparation
- Essential Tools and Equipment
- Importance of Each Tool
- Ingredients
- For the Dough
- For Coloring
- How to Make Vampire Bread
- Step 1: Prepare the Milk Mixture
- Step 2: Combine Dry Ingredients
- Step 3: Mix Wet Ingredients
- Step 4: Knead the Dough
- Step 5: Divide and Rest the Dough
- Step 6: Color the Dough
- Step 7: First Rise
- Step 8: Punch Down & Shape
- Step 9: Prepare Colorful Layers
- Step 10: Form the Loaf
- Step 11: Second Rise
- Step 12: Preheat Oven
- Step 13: Bake
- Step 14: Cool & Slice
- How to Serve Vampire Bread
- Creepy Sandwiches
- Toast with Cinnamon
- Charcuterie Board
- Halloween Party Platter
- Spooky Grilled Cheese
- How to Perfect Vampire Bread
- Best Side Dishes for Vampire Bread
- Common Mistakes to Avoid
- Storage & Reheating Instructions
- Refrigerator Storage
- Freezing Vampire Bread
- Reheating Vampire Bread
- Frequently Asked Questions
- What makes Vampire Bread special?
- Can I use whole wheat flour?
- How do I customize the colors of my Vampire Bread?
- Is Vampire Bread suitable for sandwiches?
- How long does it take to make Vampire Bread?
- Final Thoughts
- 📖 Recipe Card
Why You’ll Love This Recipe
- Eye-Catching Appearance: The striking black and red swirls make this bread a showstopper at any event.
- Versatile Uses: Enjoy it plain, toasted with cinnamon, or as part of creepy sandwiches for your Halloween party.
- Fun Baking Project: Making Vampire Bread is an engaging activity that friends and family can enjoy together.
- Allergen-Friendly: This recipe avoids common allergens like pork products and animal-derived gelatin.
- Easy to Follow: With clear instructions for both bread machine and hand-kneading methods, anyone can bake this delicious bread.
Tools and Preparation
Before diving into the recipe, gather your essential tools. Having everything ready will make the process smoother and more enjoyable.
Essential Tools and Equipment
- Stand mixer or mixing bowls
- Dough hook or hands for kneading
- Measuring cups and spoons
- Tea towel
- 9×5 inch loaf pan
Importance of Each Tool
- Stand mixer: Makes mixing and kneading easier, especially if you’re making larger batches of dough.
- Dough hook: Perfect for efficient kneading; saves time and effort compared to hand kneading.
- Measuring cups and spoons: Accurate measurements are crucial for achieving the right consistency in your bread.

Ingredients
For the Dough
- 1 cup hot reduced fat milk
- 1 egg yolk
- 3 cups all-purpose flour
- 2 ½ tablespoons sugar
- 2 ¼ teaspoons active dry yeast
- 1 ½ tablespoons butter
- 1 teaspoon salt
For Coloring
- Black food coloring
- Red food coloring
How to Make Vampire Bread
Step 1: Prepare the Milk Mixture
In a small bowl, whisk together the hot milk and egg yolk. Microwave for an additional 25–30 seconds if necessary to warm further. Set aside.
Step 2: Combine Dry Ingredients
In a large bowl or stand mixer, whisk together the flour, sugar, and yeast until well blended.
Step 3: Mix Wet Ingredients
Add the warm milk mixture along with the butter and salt to the dry ingredients. Stir until everything is combined.
Step 4: Knead the Dough
Knead the dough by hand for about 10 minutes or use a dough hook in your stand mixer for approximately 5 minutes until smooth.
Step 5: Divide and Rest the Dough
Divide the dough into two or three portions. Place each portion in separate small bowls, cover them with a tea towel, and let them rest briefly.
Step 6: Color the Dough
Add food coloring to each piece of dough (e.g., one red and one black). Knead each until fully colored.
Step 7: First Rise
Cover again with a tea towel and let rise in a warm area until doubled in size—about 1.5 hours.
Step 8: Punch Down & Shape
Once risen, punch down the dough gently. Transfer it to a lightly floured surface.
Step 9: Prepare Colorful Layers
If desired, divide again into four pieces. Roll each piece into an 8×4” rectangle based on your preferred color order.
Step 10: Form the Loaf
Stack your rolled pieces in order. Roll tightly from one short end to form a loaf shape. Place it into a greased or parchment-lined loaf pan.
Step 11: Second Rise
Cover again and let rise until doubled—about another hour.
Step 12: Preheat Oven
Preheat your oven to 375°F (190°C).
Step 13: Bake
Bake for around 30 minutes or until the bread sounds hollow when tapped on its bottom.
Step 14: Cool & Slice
Allow it to cool completely before slicing into about twelve pieces.
Enjoy serving your vibrant Vampire Bread at any spooky gathering!
How to Serve Vampire Bread
Vampire Bread is not only a feast for the eyes but also a versatile addition to your Halloween celebrations. Here are some creative ways to serve this spooky delight that will impress your guests.
Creepy Sandwiches
- Use slices of Vampire Bread as the base for sandwiches filled with turkey, cheese, or vegetables. Cut them into fun shapes using cookie cutters for an extra festive touch.
Toast with Cinnamon
- Toast slices of Vampire Bread and sprinkle with cinnamon sugar for a deliciously sweet treat. This is perfect for breakfast or an afternoon snack.
Charcuterie Board
- Incorporate Vampire Bread into a charcuterie board. Pair it with various spreads like hummus, pesto, or cream cheese, along with fruits and nuts for a balanced platter.
Halloween Party Platter
- Slice the bread into small pieces and serve alongside themed dips like pumpkin hummus or beetroot dip. This makes for an eye-catching party platter that guests will love.
Spooky Grilled Cheese
- Make a grilled cheese sandwich using Vampire Bread and your choice of cheese. The contrasting colors make it visually appealing while being deliciously gooey.
How to Perfect Vampire Bread
To achieve the best results when making Vampire Bread, consider these helpful tips that can enhance both flavor and texture.
Use Fresh Yeast: Ensure your yeast is fresh for optimal rise. Expired yeast can lead to dense bread that doesn’t rise properly.
Knead Thoroughly: Knead the dough until it’s smooth and elastic. Proper kneading develops gluten, which gives the bread its structure.
Monitor Rising Time: Keep an eye on the dough during rising. Warmer environments can speed up the process, so check frequently to avoid over-proofing.
Add Food Coloring Gradually: When incorporating food coloring, add small amounts at a time until you reach your desired shade. This prevents overly saturated dough that can affect texture.
Cool Completely Before Slicing: Allow the bread to cool fully before slicing. This ensures clean cuts and prevents the bread from becoming gummy.
Best Side Dishes for Vampire Bread
Pairing side dishes with Vampire Bread can elevate your meal experience. Here are some great options to consider:
Pumpkin Soup: A warm bowl of pumpkin soup complements the sweet notes of Vampire Bread perfectly during fall gatherings.
Roasted Vegetables: Serve a medley of roasted seasonal vegetables for a healthy side that balances out the bread’s richness.
Garlic Herb Butter: Spread garlic herb butter on toasted slices of Vampire Bread for an aromatic and flavorful addition.
Spicy Hummus: Pairing with spicy hummus adds a kick that contrasts nicely with the sweetness of the bread, creating a unique flavor profile.
Mixed Green Salad: A light mixed green salad dressed in vinaigrette provides freshness that harmonizes well with Vampire Bread’s flavors.
Cheesy Cauliflower Bake: The creamy texture of cheesy cauliflower bake makes it a rich side dish that pairs wonderfully with soft Vampire Bread slices.
Fruit Salad: A refreshing fruit salad offers a sweet contrast and cleanses the palate between bites of savory dishes.
Stuffed Bell Peppers: Serve stuffed bell peppers filled with quinoa or rice as a hearty side dish that complements your spooky-themed meal.
Common Mistakes to Avoid
Making Vampire Bread can be a fun activity, but there are some common mistakes that can affect your results.
- Boldly skip the kneading: Kneading is crucial for developing gluten, which gives the bread its structure. Make sure to knead by hand or with a dough hook until smooth.
- Boldly overlook the rising time: Proper rising is essential for fluffy bread. Don’t rush this step; allow the dough to double in size as directed.
- Boldly ignore flour measurements: Accurate flour measurement is key to achieving the right dough consistency. Use a kitchen scale or the spoon-and-level method for precision.
- Boldly neglect color mixing: When adding food coloring, ensure it’s fully incorporated into each dough piece. This will give you a vibrant swirled effect in the final loaf.
- Boldly forget about cooling: Letting the bread cool completely before slicing prevents it from becoming gummy. Patience will pay off with better texture!
Storage & Reheating Instructions
Refrigerator Storage
- Store Vampire Bread in an airtight container.
- It can last in the refrigerator for up to 5 days.
Freezing Vampire Bread
- Wrap slices tightly in plastic wrap or aluminum foil.
- Place them in a freezer-safe bag or container. Frozen Vampire Bread can last up to 3 months.
Reheating Vampire Bread
- Oven: Preheat to 350°F (175°C) and warm slices for about 10 minutes until heated through.
- Microwave: Heat individual slices on medium power for about 15-20 seconds.
- Stovetop: Toast slices in a skillet on medium heat for 2-3 minutes per side until golden and warmed.
Frequently Asked Questions
Here are some common questions people have about making Vampire Bread.
What makes Vampire Bread special?
Vampire Bread is not only visually striking with its black and red swirls, but it also has a slightly sweet flavor that pairs well with various spreads and toppings.
Can I use whole wheat flour?
Yes, you can substitute part of the all-purpose flour with whole wheat flour for added nutrition. However, you may need to adjust liquid amounts slightly.
How do I customize the colors of my Vampire Bread?
Feel free to experiment with different color combinations using food coloring. You could use orange and purple for a festive twist too!
Is Vampire Bread suitable for sandwiches?
Absolutely! This bread makes an excellent base for themed sandwiches at Halloween parties or gatherings.
How long does it take to make Vampire Bread?
The total time from start to finish is approximately 3 hours and 5 minutes, which includes preparation, cooking, and rising times.
Final Thoughts
Vampire Bread is a delightful addition to any Halloween celebration or cozy fall gathering. Its striking appearance and soft texture make it versatile enough for various uses—whether served plain, toasted, or as an eye-catching sandwich base. Feel free to customize it with your favorite colors and flavors!
Did You Enjoy Making This Recipe? Please rate this recipe with ⭐⭐⭐⭐⭐ or leave a comment.
📖 Recipe Card
Print
Vampire Bread
- Total Time: 1 hour 15 minutes
- Yield: Approximately 12 servings 1x
Description
Vampire Bread is the perfect festive treat for Halloween, combining a striking visual appeal with a soft and slightly sweet flavor. This vibrant swirled loaf, featuring bold black and red hues, is not only an eye-catching centerpiece but also serves as a versatile base for sandwiches or delightful toasted snacks. Ideal for baking with family, this unique recipe invites creativity in the kitchen without the use of any pork or alcohol-based ingredients, making it suitable for everyone to enjoy. Bring some spooky fun to your celebration with this easy-to-follow recipe!
Ingredients
- 1 cup hot reduced-fat milk
- 1 egg yolk
- 3 cups all-purpose flour
- 2 ½ tablespoons sugar
- 2 ¼ teaspoons active dry yeast
- 1 ½ tablespoons butter
- 1 teaspoon salt
- Black food coloring
- Red food coloring
Instructions
- In a small bowl, whisk together hot milk and egg yolk; set aside.
- In a large mixing bowl, combine flour, sugar, and yeast.
- Stir in the warm milk mixture along with butter and salt until combined.
- Knead dough by hand (10 minutes) or using a stand mixer (5 minutes) until smooth.
- Divide into portions; rest briefly before adding food coloring to each piece.
- Let the colored dough rise until doubled in size (about 1.5 hours).
- Shape the dough into layers, roll tightly into a loaf, and let rise again.
- Bake at 375°F (190°C) for approximately 30 minutes or until hollow when tapped.
- Prep Time: 45 minutes
- Cook Time: 30 minutes
- Category: Baking
- Method: Baking
- Cuisine: Halloween
Nutrition
- Serving Size: 1 serving
- Calories: 130
- Sugar: 3g
- Sodium: 110mg
- Fat: 2g
- Saturated Fat: 1g
- Unsaturated Fat: 0.5g
- Trans Fat: 0g
- Carbohydrates: 25g
- Fiber: 1g
- Protein: 4g
- Cholesterol: 20mg