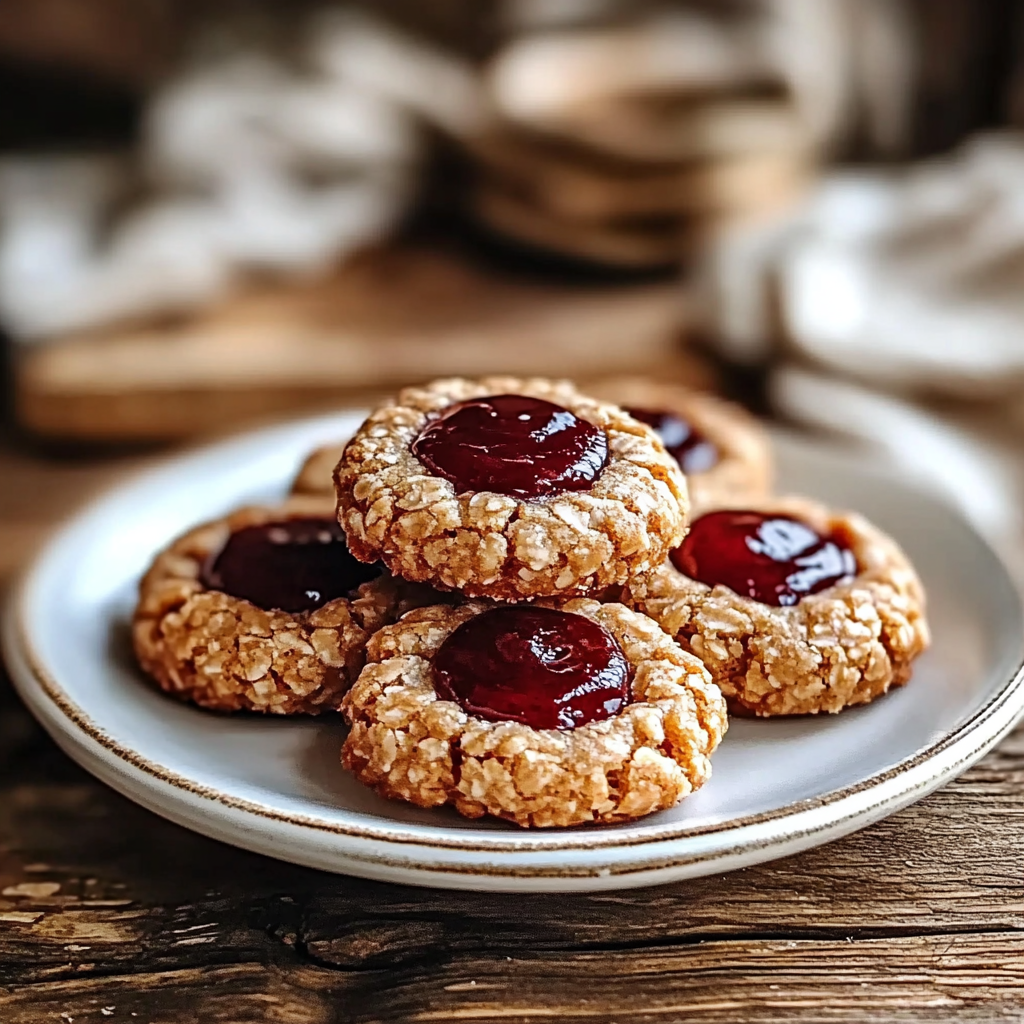
The aroma of freshly baked Thumbprint Cookies wafts through the air, wrapping you in a warm embrace of sweet nostalgia. With their buttery texture and delightful fruit-filled center, these cookies are a treat that dances on your taste buds and brings back memories of family gatherings and holiday cheer.

Jump to:
- Ingredients for Thumbprint Cookie
- How to Make Thumbprint Cookie
- <strong>Perfecting the Cooking Process</strong>
- <strong>Add Your Touch</strong>
- <strong>Storing & Reheating</strong>
- FAQs:
- What ingredients do I need for Thumbprint Cookies?
- How do I prepare the dough for Thumbprint Cookies?
- Can I freeze Thumbprint Cookies?
- How do I store Thumbprint Cookies?
- Conclusion for Thumbprint Cookie:
- 📖 Recipe Card
Picture this: you’re sitting at Grandma’s kitchen table, flour dusting your nose like some kind of baking badge of honor. The laughter of loved ones fills the room as you carefully create little indents in each cookie before filling them with vibrant jam. Whether it’s a sunny afternoon or a cozy winter evening, nothing beats the anticipation of biting into one of these delightful treats.
Why You'll Love This Recipe
- These Thumbprint Cookies are surprisingly easy to make, perfect for bakers of all levels.
- Their buttery goodness combined with fruity fillings creates a flavor explosion.
- The colorful jam centers make them visually appealing, guaranteeing they’ll steal the show on any dessert table.
- Plus, you can customize the flavors with your favorite jams or jellies for a personal touch!
Ingredients for Thumbprint Cookie
Here’s what you’ll need to make this delicious dish:
- Unsalted Butter: Use room temperature butter for easier mixing, ensuring your cookies have that rich, buttery flavor.
- Granulated Sugar: This sweetener is essential for achieving the perfect balance between sweetness and texture in your cookies.
- All-Purpose Flour: Helps create that tender structure; sift it beforehand to avoid lumps.
- Vanilla Extract: A splash will add depth to your cookie’s flavor profile; opt for pure vanilla for the best results.
- Fruit Jam or Jelly: Choose your favorite flavor—raspberry, apricot, or strawberry work wonderfully in these cookies.
- Baking Powder: Just a pinch helps the cookies rise slightly while keeping them soft and chewy.
The full ingredients list, including measurements, is provided in the recipe card directly below.
How to Make Thumbprint Cookie
Follow these simple steps to prepare this delicious dish:
Step 1: Preheat Your Oven
Preheat your oven to 350°F (175°C). This ensures that your cookies bake evenly and achieve that lovely golden color.
Step 2: Cream Butter and Sugar
In a large mixing bowl, cream together the unsalted butter and granulated sugar until light and fluffy. This should take about 3-5 minutes with an electric mixer—just long enough to enjoy some kitchen dance moves!
Step 3: Add Vanilla and Dry Ingredients
Stir in the vanilla extract. In another bowl, combine all-purpose flour and baking powder. Gradually add this dry mixture to the wet ingredients until just combined; don’t overmix unless you fancy tough cookies!
Step 4: Form Cookie Dough
Scoop out tablespoons of dough and roll them into balls. Place them onto ungreased baking sheets about two inches apart so they have room to spread out during baking.
Step 5: Create Thumbprints
Using your thumb (or the end of a wooden spoon if you want to keep things classy), press down gently in the center of each dough ball to create an indent.
Step 6: Fill with Jam
Spoon about half a teaspoon of fruit jam into each thumbprint. Don’t be shy here; it’s where all the magic happens!
Bake in the preheated oven for about 12-15 minutes until lightly golden around the edges but still soft in the center. Transfer them to wire racks to cool completely.
These Thumbprint Cookies are perfect for sharing—if you can resist eating them all yourself! Enjoy with a cup of tea or coffee as you reminisce about those sweet moments spent with loved ones.
You Must Know
- These delightful thumbprint cookies are not just treats; they’re perfect for any occasion!
- With a burst of fruity filling at the center, they add a pop of color and flavor to your dessert table.
- Plus, they’re easy to whip up, making them a go-to recipe for cookie lovers everywhere.
Perfecting the Cooking Process
Start by preparing your cookie dough first, allowing it to chill while you gather your fillings. Preheat the oven as you roll the dough into balls and create those iconic thumbprint indentations before baking.
Add Your Touch
Feel free to get creative with your fillings! Swap out traditional fruit preserves for chocolate ganache or peanut butter for a fun twist. You can also experiment with spices like cinnamon or nutmeg in the dough.
Storing & Reheating
Store your thumbprint cookies in an airtight container at room temperature for up to a week. If you want to freeze them, layer between parchment paper and store in a freezer-safe bag for up to three months.
Chef's Helpful Tips
- Always let your dough chill before baking; this helps maintain the shape and texture of your cookies.
- Use a good quality fruit preserve for maximum flavor explosion!
- When creating thumbprints, don’t press too hard; you want a nice indentation without breaking the cookie’s structure.
Sometimes I whip up these thumbprint cookies during family gatherings, and watching everyone fight over their favorite flavors always brings me joy. It’s like cookie chaos, but in the best way possible!
FAQs:
What ingredients do I need for Thumbprint Cookies?
To make delicious Thumbprint Cookies, you will need all-purpose flour, unsalted butter or a dairy-free alternative, granulated sugar, brown sugar, vanilla extract, and a pinch of salt. For the filling, choose your favorite fruit jam, such as raspberry, apricot, or strawberry. If you’re looking for a vegan option, substitute butter with coconut oil or margarine. Ensure that any plant-based ingredients align with your dietary preferences while ensuring great flavor.
How do I prepare the dough for Thumbprint Cookies?
Preparing the dough for Thumbprint Cookies is simple. Start by creaming butter and sugars together until fluffy. Gradually add in the flour and salt until a soft dough forms. Once mixed well, chill the dough in the refrigerator for about 30 minutes. Chilling helps maintain the cookie shape during baking. After chilling, scoop out small amounts of dough and roll them into balls before creating thumbprints in the center with your thumb or finger.
Can I freeze Thumbprint Cookies?
Yes! Freezing Thumbprint Cookies is an excellent way to preserve their freshness. After baking and allowing them to cool completely, place the cookies in an airtight container or zip-top bag. You can freeze them for up to three months. When you are ready to enjoy them again, simply remove them from the freezer and let them thaw at room temperature for about an hour before serving.
How do I store Thumbprint Cookies?
Storing Thumbprint Cookies properly ensures they stay fresh and delicious. Place cooled cookies in an airtight container at room temperature. They will last for up to one week this way. If you live in a humid climate, consider storing them in the refrigerator to maintain their texture and flavor longer. Always ensure that cookies are completely cooled before storing to prevent moisture buildup.
Conclusion for Thumbprint Cookie:
Thumbprint Cookies are delightful treats that anyone can enjoy. With simple ingredients like flour, butter, and fruit jam, they offer a sweet balance of flavors. Preparing these cookies requires minimal effort yet yields impressive results that are perfect for gatherings or personal indulgence. Remember to chill your dough for better structure during baking and explore various jam fillings to suit your taste. Enjoy making these delicious cookies!
Did You Enjoy Making This Recipe? Please rate this recipe with ⭐⭐⭐⭐⭐ or leave a comment.
📖 Recipe Card
Print
Thumbprint Cookies
- Total Time: 30 minutes
- Yield: Approximately 24 cookies 1x
Description
Thumbprint Cookies are a delightful combination of buttery goodness and sweet fruit jam that evoke warm memories of family gatherings. With a tender texture and customizable fillings, these cookies are not only easy to make but also perfect for any occasion. Whether enjoyed with a cup of tea or shared with loved ones, they offer a burst of flavor that will keep everyone coming back for more.
Ingredients
- 1 cup unsalted butter (room temperature)
- 3/4 cup granulated sugar
- 2 cups all-purpose flour
- 1 tsp vanilla extract
- 1/2 cup fruit jam or jelly (raspberry, apricot, or strawberry)
- 1/2 tsp baking powder
- Pinch of salt
Instructions
- Preheat your oven to 350°F (175°C).
- In a large mixing bowl, cream together the butter and sugar until light and fluffy.
- Stir in the vanilla extract. In another bowl, whisk together flour, baking powder, and salt; gradually add to the wet mixture until combined.
- Roll tablespoons of dough into balls and place them on ungreased baking sheets.
- Press your thumb gently in the center of each ball to create an indent.
- Fill each indent with about half a teaspoon of jam.
- Bake for 12-15 minutes until edges are lightly golden. Cool on wire racks.
- Prep Time: 15 minutes
- Cook Time: 15 minutes
- Category: Dessert
- Method: Baking
- Cuisine: American
Nutrition
- Serving Size: 1 cookie (18g)
- Calories: 80
- Sugar: 5g
- Sodium: 25mg
- Fat: 5g
- Saturated Fat: 3g
- Unsaturated Fat: 2g
- Trans Fat: 0g
- Carbohydrates: 9g
- Fiber: <1g
- Protein: <1g
- Cholesterol: 15mg